
Learn LiDAR
After DJI Terra: Classify Your Zenmuse L1 or L2 Point Cloud Automatically
DJI Terra hands you a LAS with ground points separated from everything else. This is how to turn that file into a fully classified cloud, a terrain model and CAD layers in one processing run.
No credit card required • 50 hectares included
The short answer
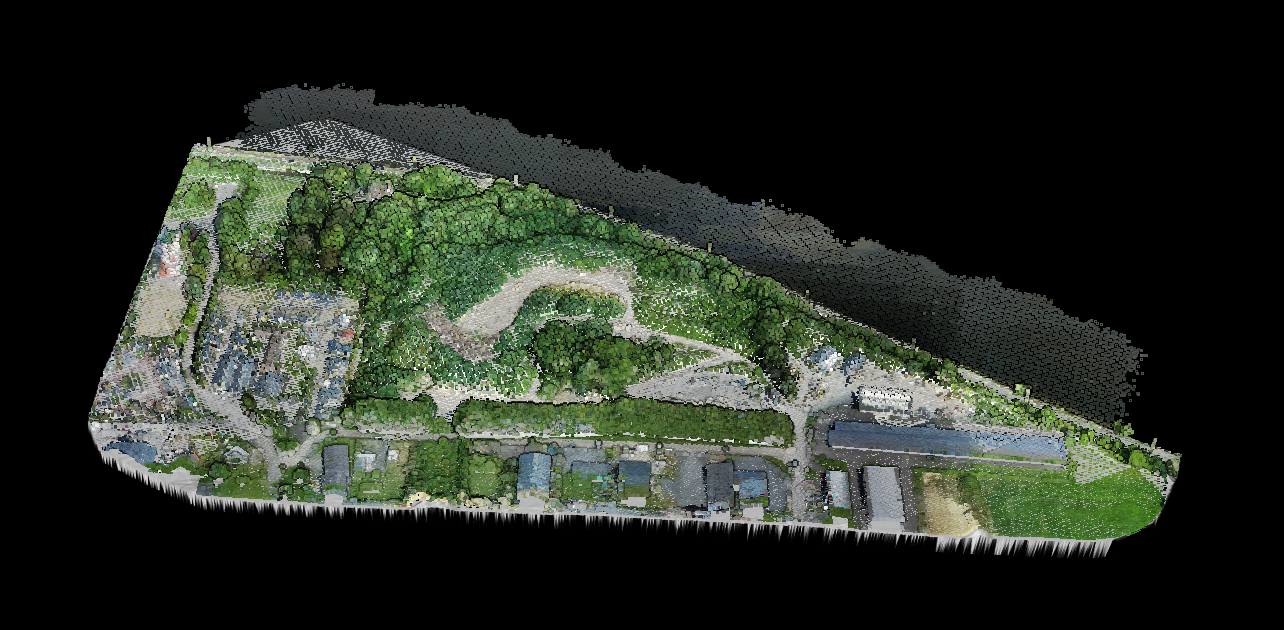
Export the point cloud from DJI Terra as LAS, upload it to Lidarvisor, tick the deliverables you need and run. One run returns the same cloud with every point labelled: ground, low, medium and high vegetation, buildings, water, wires, towers, vehicles, walls, hedges and noise. It also returns the terrain model, the contours and vector layers you asked for, a topographic map sheet and a project report.
You do not have to take that on trust. Every Lidarvisor account contains a project called Demo 1 - Land Surveying: a DJI Zenmuse flight over Ouistreham, France, 18.1 hectares, 22 million points, 121 points per square metre. Every screenshot below comes from it, and you can open it before uploading anything of your own.
Its run, with the full option set listed further down, took 40 minutes 15 seconds. The project panel shows the elapsed time once a run completes.
What the Terra LAS contains, and what it does not
DJI describes Terra’s ground point classification as preserving only the bare ground points. The rest of the cloud stays in one group, and the gaps below are the ones DJI forum users keep reporting.
In the Terra export
Ground is separated. Everything else is one undifferentiated class.
- No vegetation classes. In a DJI forum user’s words, “it’s just all the rest of the points”.
- No building class. A DJI forum user reports buildings coming out “classified as vegetation”.
- No noise class. Stray returns stay in the file and, as a DJI forum user puts it, noise “messes with the ground classification”.
- Overlapping flight lines can leave elevation jumps at swath edges and, in a DJI forum user’s words, “tracks along the flight path”.
After one Lidarvisor run
The classifier runs on every point of the upload. There are no classifier settings to tune.
- Every point labelled, including low, medium and high vegetation, buildings, water and noise.
- Buildings as their own class, and as footprint polygons when you tick Extract Buildings.
- Noise flagged as its own class and kept out of the terrain model, without deleting anything from your file.
- Flight lines checked and, when you tick Align Flight Lines, corrected before classification.
Export settings that matter in Terra
Four choices in Terra’s export decide what arrives on the other side.
Format
Terra writes LAS 1.2, according to DJI’s own LiDAR guide. Lidarvisor reads LAS and LAZ as they are, so there is nothing to convert.
Coordinate system
Set Terra’s output coordinate system to the projected system your drawing uses. Lidarvisor reads it from the LAS header and asks you to pick one when the header carries none. The demo file is in EPSG 3949.
Colour
Keep the RGB values from the Zenmuse camera. The viewer shows them and the orthophoto option builds its image from them. A cloud without colour can be colourised from 30 cm satellite imagery instead.
Accuracy optimisation and smoothing
Terra’s Optimize Point Cloud Accuracy switch is its strip alignment; DJI recommends it when the result shows layering. Terra’s smoothing reduces point cloud thickness. Lidarvisor has its own smoothing step, off by default, for clouds that are visibly noisy.
Doing it in Lidarvisor, step by step
The demo project was processed exactly this way. Nothing to install; everything runs in the browser.
Create a project
Click Create a project, name it and drop in the LAS or LAZ from Terra. If you only need part of the flight, crop it now: upload a KML, KMZ, GeoJSON or shapefile, or draw a polygon on the map. The crop is locked once processing starts.
Check the coordinate system
Lidarvisor reads the coordinate system from the LAS header. If Terra wrote none, pick it from the list before you launch. Leave the photogrammetry tick box off: a Zenmuse cloud is LiDAR, and that box changes which deliverables are offered.
Choose the deliverables
Pick the Topographic survey preset, then adjust. The demo run used the DTM at 50 cm, Extract Buildings, major and minor contours and the topographic map, with power lines, towers, roads, tree tops and tree crowns left off. Align Flight Lines is off by default; it needs at least three overlapping lines.
Run
Credits are counted on area: 18 hectares is 18 credits, and a new account starts with 50. The demo run finished in 40 minutes 15 seconds, and the panel shows the elapsed time when a run completes.
Check the result
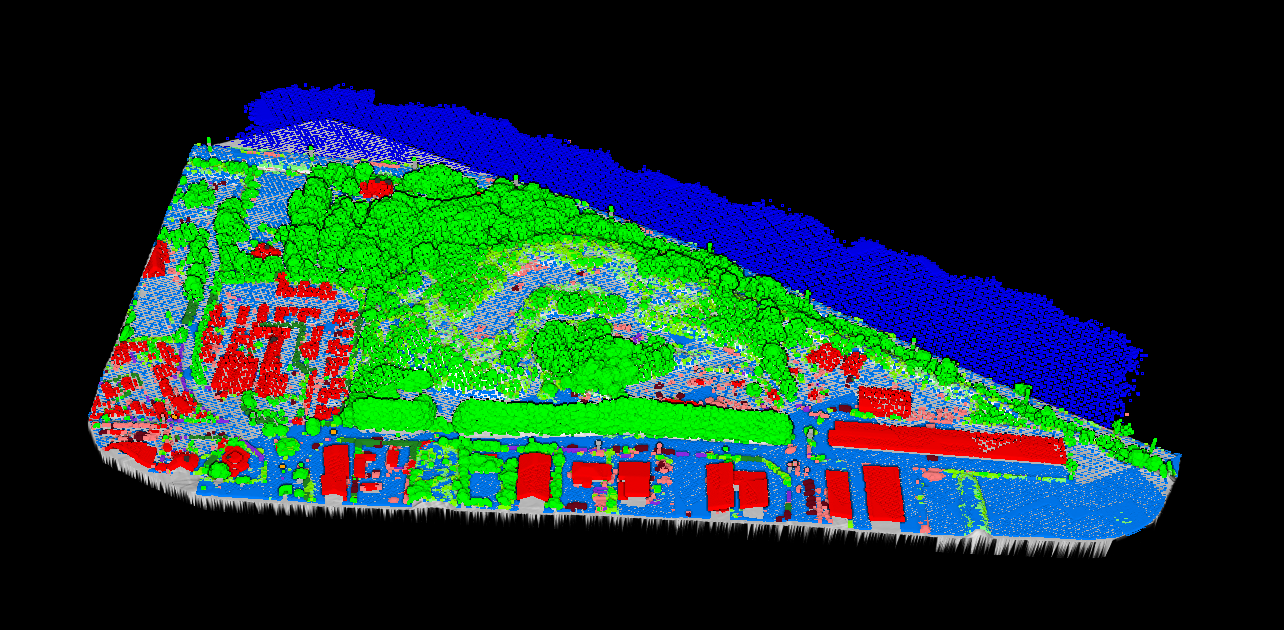
Switch the point cloud colour mode to Class and toggle classes in the layer tree. Open the Elevation Profile tool, click two points and read the ground line under the canopy. On your own projects, the Classify button opens the manual editing tools.
Download
Each layer has its own download icon. The point cloud comes as LAS, LAZ, COPC, E57 or PLY; rasters as GeoTIFF; vector layers as GeoJSON, Shapefile or DXF; the topographic map as DXF or PDF; the report as PDF. Exporting your own project’s files needs a paid plan; demo projects download on every plan.
What the demo run returned
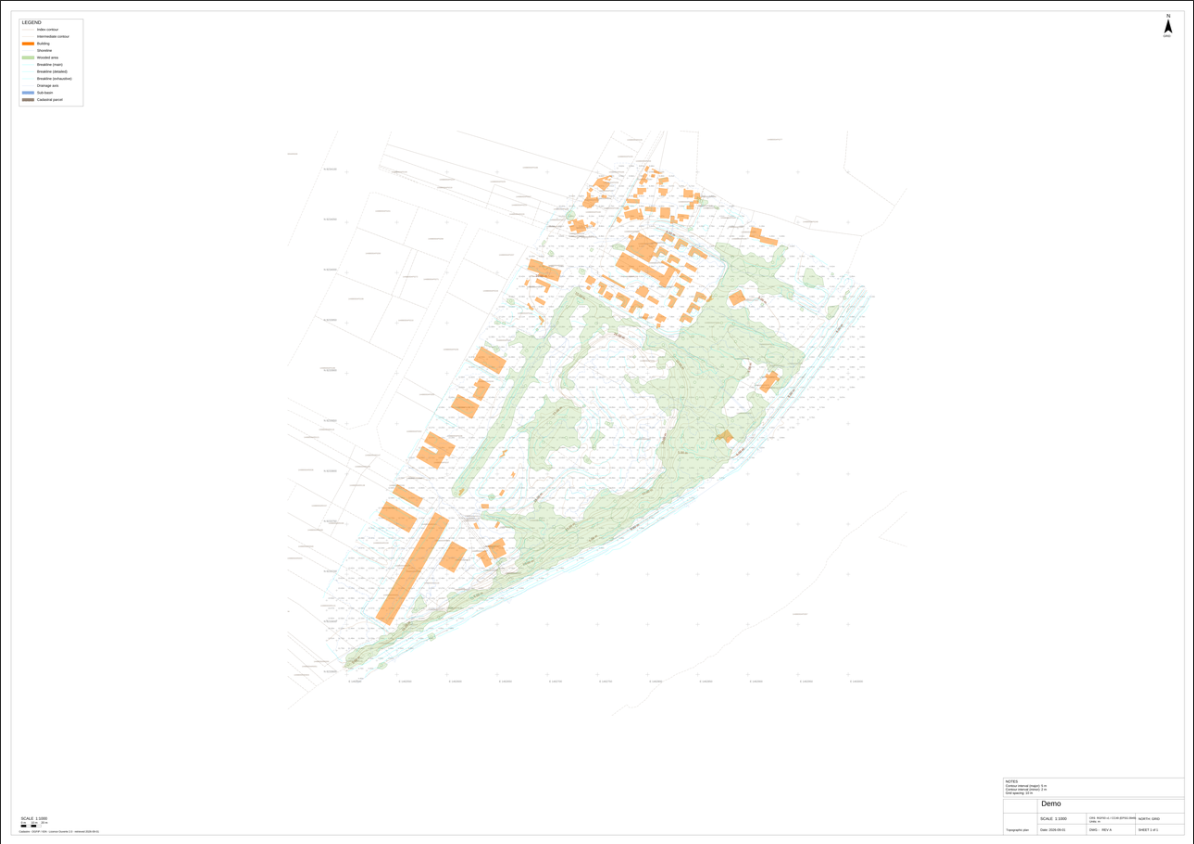
Every item below reached READY in the same run. The point cloud is the only input.
| Deliverable | What it contains | Download |
|---|---|---|
| Classified point cloud | Every point carrying a class code | LAS, LAZ, COPC, E57, PLY |
| Digital terrain model | Bare-earth raster at 50 cm, built from ground points only | GeoTIFF |
| Digital surface model and slope map | The visible surface including trees and roofs; the slope of the terrain | GeoTIFF |
| Orthophoto | An image built from the RGB values of the point cloud | GeoTIFF |
| Contours (major and minor) and grid | Lines traced from the terrain model; spot heights on a regular grid | GeoJSON, Shapefile, DXF |
| Breaklines (main, detailed, exhaustive) | Slope discontinuities as 3D lines, in three density tiers | GeoJSON, Shapefile, DXF |
| Buildings | Footprint polygons from the building class | GeoJSON, Shapefile, DXF |
| Shoreline, drainage axes, sub-basins | The land and water edge; the runoff network as 3D polylines; the catchments | GeoJSON, Shapefile, DXF |
| Vegetation areas | The outline of wooded areas, the way a topographic plan draws them | GeoJSON, Shapefile, DXF |
| Cadastral parcels | Property boundaries from the national open-data cadastre, indicative only | GeoJSON, Shapefile, DXF |
| Topographic map | A sheet with legend, scale bar, grid, contours, buildings, wooded areas, breaklines, drainage and parcels | DXF, PDF |
| Project report | Data received, acquisition, processing chain, quality control, deliverables, cross-sections, limitations of use |
Every result is viewable online on any plan. Exporting the files of your own projects needs an active paid subscription; demo projects are exempt.
The classes in the demo cloud
Measured on the classified cloud after subsampling, 4.9 million points.
| Class | Code | Share of points |
|---|---|---|
| Low, medium and high vegetation | 3, 4, 5 | 69% |
| Ground | 2 | 20% |
| Water | 9 | 8% |
| Building | 6 | 4% |
| Noise, wires, towers, roof objects, vehicles, fences and walls, hedges | 7, 13, 15, 23, 24, 26, 27 | small numbers |
The class legend in the viewer holds 28 entries: the standard ASPRS codes plus custom codes 23 to 28 for roof objects, vehicles, poles, fences and walls, hedges and solar panels.
Checking the result under the trees
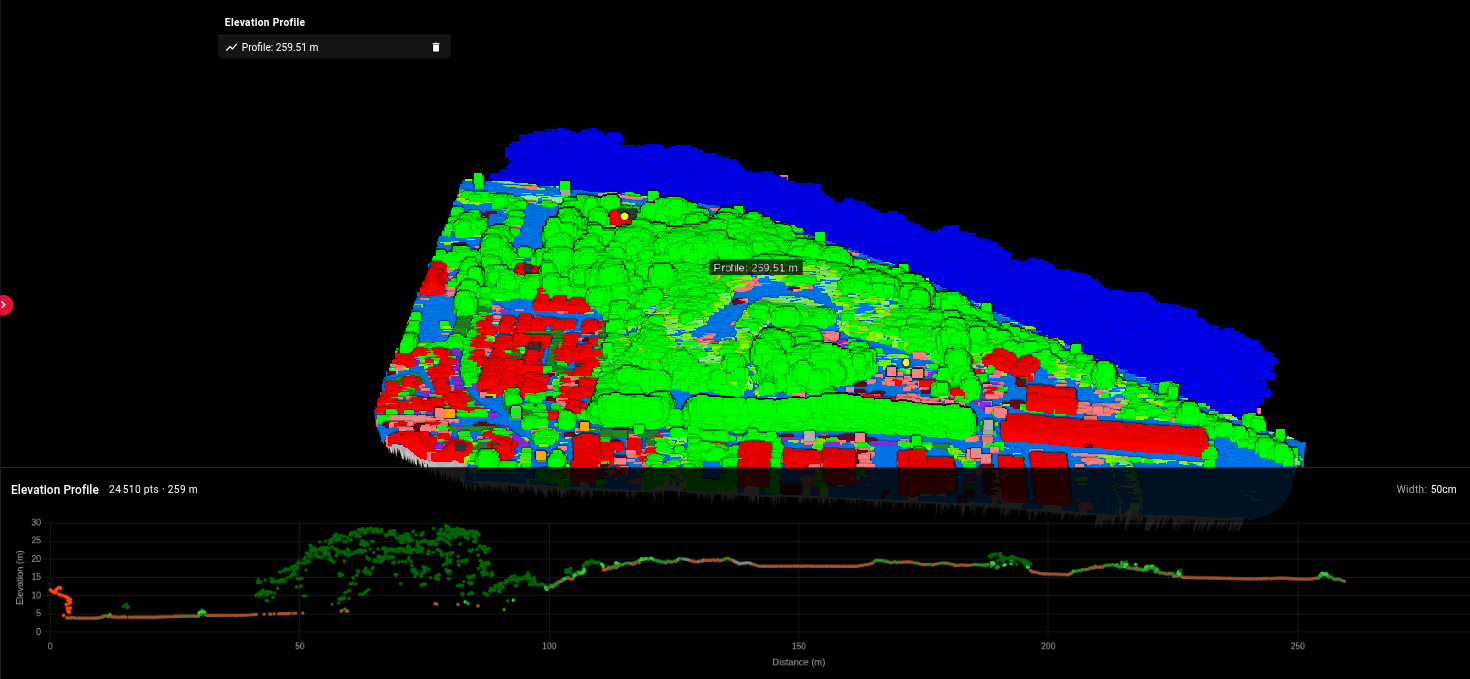
Classification decides everything downstream, so look at it before you download. Two checks take a few minutes each.
Cross-sections. The Elevation Profile tool draws a corridor between two points you click and plots every point inside it against distance, coloured by class. Under a wood the test is simple: the ground line should run continuously beneath the canopy. The corridor width is adjustable and the profile exports as CSV or DXF.
Editing a class. On your own projects, the Classify button next to the point cloud opens manual editing: a brush, a height threshold, a colour pick and an intensity pick, each reassigning the points it selects to the class you choose. Saved edits are written into the file with the sync button before you download it. Demo projects cannot be edited.
The report. The project report PDF has sections for the data received, the processing chain, quality control, the deliverables, cross-sections and limitations of use, so the checks you make here have a written trace to hand over with the files.
What stays in Terra, and on the desktop
Terra stays in the workflow. It is the software that turns the raw Zenmuse recording into a LAS, and nothing here replaces that step. Lidarvisor starts where Terra’s export ends.
TerraScan, Global Mapper and LP360 are not replaced either. They remain the tools for interactive editing at scale, drafting in CAD, volumes and everything else a desktop licence does well. What changes is what you hand them: a cloud already classified, a terrain model already built and layers already on DXF, instead of a ground-only LAS.
What it costs
Lidarvisor bills on area: one credit is one hectare, about 2.5 acres. A new account starts on the Freemium plan with 50 hectares included, so the 18-hectare demo, or a flight of the same size, is processed within the free allowance. On Freemium you view every result online; downloading the files of your own projects needs a paid plan, while demo projects can be downloaded on any plan.
Beyond the free allowance, the Advanced plan is from $0.33 per hectare on the annual plan, and credit packs run from $0.99 per hectare for 100 credits down to $0.35 per hectare for 10,000 credits. Credit packs need an active subscription.
Frequently asked questions
Does DJI Terra classify vegetation and buildings?
No. Terra’s ground point classification separates bare ground from everything else; DJI describes it as preserving only the bare ground points. Vegetation, buildings and noise stay in one group, which is what DJI forum users mean when they write that there is no vegetation classification. Lidarvisor’s classifier labels every point in that group.
Can a Zenmuse L2 point cloud be classified automatically?
Yes. Export the LAS from Terra, upload it and run; there are no classifier settings. The demo project in every account is a Zenmuse flight, so you can inspect the result on a comparable cloud before uploading your own.
How is noise handled?
Stray returns are detected as part of the classification run and labelled as noise rather than deleted, so nothing is removed from your upload. The terrain model is built from ground points only, so flagged points never reach the DTM or the contours. A separate smoothing option exists for clouds that are visibly noisy; it is off by default because it lengthens processing.
What about the elevation jumps between flight lines?
Tick Align Flight Lines when you launch. It finds the overlapping passes in the cloud, checks how well each fits its neighbours and corrects the ones that are clearly off, before classification, so every deliverable is built from the corrected data. Lines that already fit are left untouched and your uploaded file is never modified. It needs at least three overlapping lines; with two there is no way to tell which one is off. When it runs, the project report’s flight-line consistency section states what was found.
Which coordinate system should the Terra export use?
The projected system your deliverables are expected in. Lidarvisor reads the coordinate system from the LAS header and, when the header carries none, asks you to pick one before launching.
Related resources
Drone LiDAR processing
From raw UAV point clouds to classified deliverables, step by step.
Read the guideAerial LiDAR classification
ASPRS classes online, and the ground, vegetation, building, wire and pole edge cases to review before export.
Read the guidePoint cloud to CAD
Classification, terrain model, contours, footprints, layers and the DXF export.
Read the guideLiDAR topography
DTM, contours, hillshade, slope maps and survey-ready exports.
Read the guideClassify your Terra export
Upload the LAS you exported from DJI Terra and get a classified cloud, a terrain model and CAD-ready layers from one run.
Upload your Terra LAS50 hectares free. No credit card. No software to install.